One thing I enjoy about wine production is the long timeline. It allows you to take your leisure with the process and make micro-adjustments as you go. Add a touch of oak. Let the flavors mature. Take the wine off the lees and basically wait for it to reach the point you want it to.
Besides making wine, I also brew beer, which in comparison is a harried sprint. The two weeks of hustle that is the crush in wine making is roughly the same time frame for every batch of beer. The equivalent of racking in beer-brewing is secondary fermentation. Secondary fermentation is a one to two week process, though it can stretch out to over a month with high gravity beers. Compare this to the 6 month or more spent racking and aging wine and the difference is expansive.
The extra time gives you opportunities to ruminate on and appreciate the process. You can make small tweaks to the final production along the way. In beer brewing, the batch is going to do what it's going to do and there are few opportunities other than futzing with some early steps to alter the final product (short of fucking it up or changing the temperature). You basically have to make your changes in the next batch, which in beer could be next week, not next harvest.
The seasonal aspects of wine making is one of it's quirks. The craziness of harvest and crush; where there are several tasks that require daily attention. Punching down the fermenting must. Attending to the Brix readings and acid tests as the sugar turns into alcohol. The rush to get everything together for harvesting the fruit and crushing the wine at the right day and time. All this activity is double or triple the amount of effort that goes into a batch of beer. Crush's intense activity gives way to patience and letting nature take its course once the grapes have been squeezed. Then the slower pace sets in. Over the winter I've started to appreciate the longer perspective that this pace generates.
Here's to a few more months of watching an waiting broken up by the occasional tasting and racking. Heck I might even need to do a batch of imperial stout or belgiam trippel, so I get to take a similarly long term approach to my beer making.
Thursday, February 25, 2010

Tuesday, February 23, 2010
Legal Aspects of Home Winemaking
The legality of making your own wine at home came up in conversation this week. Seeing as it's part of my profession to know (or research) answers to questions about the law I thought I'd do a quick survey of the legality and limitations on making wine at home. Turns out the production of wine is regulated by state and federal law. Prior to 1979 the federal government required a permit for producing wine for personal consumption. Kind of onerous for helping some grape juice and yeast through their biological cycles. Thankfully these requirements were dropped for quantities less that 100 gallons for a single person and 200 gallons for a household of two or more adults per year. 27 C.F.R. § 24.75 (2006). So here's to legally not paying taxes on what we produce!
So if the same three households go in on the project next year we could always up the amount to 600 gallons. Or enough wine for each household to have over two bottles of wine a day, for a year. They may be little of overkill, but it also leaves you with plenty of wine to lay away.
So if the same three households go in on the project next year we could always up the amount to 600 gallons. Or enough wine for each household to have over two bottles of wine a day, for a year. They may be little of overkill, but it also leaves you with plenty of wine to lay away.
Day 122 - 2009 Syrah - Second Racking
Crap. I thought I downloaded the pictures off my phone before I deleted them. Looks like that didn't really happen. Technology failed me again, or more likely, I failed technology.
What the pictures would show you is that there has been some yeast and other lees falling out of solution in the wine. It's been slowly piling up at the bottom of the carboys in a thin layer. These sediments are not nearly as thick this time around as they were for the first racking, but it's time to get them out of the wine and do some tasting to determine where to go next.
Based on the conversations with my fellow vinters, Saturday is going to be the day for the racking. If it's raining, it'll be inside otherwise be prepared for a driveway work-party and wine tasting.
We'll also need to figure out our oak expectations. The not quite fully-fleshed out plan seems to be we will oak some of the Syrah and leave some off of the wood. This will give us the ability to blend and adjust the flavor with the wine we have. It will also give us a few different styles of wine so we're not stuck with 38 gallons of all the exact style. This still needs to be further negotiated and agreed upon, but I'm looking forward to the next leg of the journey, starting this weekend.
What the pictures would show you is that there has been some yeast and other lees falling out of solution in the wine. It's been slowly piling up at the bottom of the carboys in a thin layer. These sediments are not nearly as thick this time around as they were for the first racking, but it's time to get them out of the wine and do some tasting to determine where to go next.
Based on the conversations with my fellow vinters, Saturday is going to be the day for the racking. If it's raining, it'll be inside otherwise be prepared for a driveway work-party and wine tasting.
We'll also need to figure out our oak expectations. The not quite fully-fleshed out plan seems to be we will oak some of the Syrah and leave some off of the wood. This will give us the ability to blend and adjust the flavor with the wine we have. It will also give us a few different styles of wine so we're not stuck with 38 gallons of all the exact style. This still needs to be further negotiated and agreed upon, but I'm looking forward to the next leg of the journey, starting this weekend.
Monday, February 1, 2010
Syrah - Day 100
This is the long slow period in our wine's production where not there is not much for the winemaker to do. In theory I'm supposed to monitor the wine every once in awhile with a tasting, but it's been since the last racking since I've tried any. The reality is we're not going to make any changes until after the next racking, since that's when we plan on oaking the wine and making any other adjustments to the flavor.
The reasoning here is the longer we wait to make the adjustments in flavor, the closer what we'll be working with will be to the taste of the finished wine. This reduces the guess work by making what we are tasting as close to the finished taste as possible. The drawback to this approach is that we'll have less time to make adjustments if our flavor needs a lot of work. Based on the tastings I've had so far, I don't believe this extra time will be necessary, but I'm just an inexperienced amateur, so that's far from certain to be the case.
That said, it's getting close to the time to do the next big step with the wine, we're coming up on the second racking. This will be pretty close to what we experienced with the first racking, but hopefully there will be less lees. This will also lead to less wine lost, since less leesl will be left on the bottom of each carboy during the racking process and with less lees, there will be less wine abandoned in the carboy.
So who's got some time to do the second racking in the next few weeks?
The reasoning here is the longer we wait to make the adjustments in flavor, the closer what we'll be working with will be to the taste of the finished wine. This reduces the guess work by making what we are tasting as close to the finished taste as possible. The drawback to this approach is that we'll have less time to make adjustments if our flavor needs a lot of work. Based on the tastings I've had so far, I don't believe this extra time will be necessary, but I'm just an inexperienced amateur, so that's far from certain to be the case.
That said, it's getting close to the time to do the next big step with the wine, we're coming up on the second racking. This will be pretty close to what we experienced with the first racking, but hopefully there will be less lees. This will also lead to less wine lost, since less leesl will be left on the bottom of each carboy during the racking process and with less lees, there will be less wine abandoned in the carboy.
So who's got some time to do the second racking in the next few weeks?
Monday, January 18, 2010
2009 Syrah - Day 86 - Wine Bottle Cleaning
 One place we're cutting costs for our wine making project is by reusing old wine bottles. Since new wine bottles can run you about $15 for a case of twelve, this could quickly add up to be a larger expense than the cost of the grapes that we'll be filling the bottles with. So reusing bottles if you have the time and inclination to accumulate them is a much better way to go. Since before the holidays we've been saving our bottles and asking our friends and family to do the same. At this point I have a pile of bottles waiting for us in my garage. However, just repackaging another winemaker's bottle with our wine is not what we set out to do. We want the full experience and we want the people enjoying a bottle of our wine to know who made it, where the grapes came from and what grape it is. To do this, we need to get rid of the labels and cork protectors that are currently on the wine bottles and replace them with our own.
 The easiest part of the bottle cleanup process (other than rinsing out the bottles immediately after finishing the original contents) is to peel off the foil or plastic cork cover. This is easy and often gets done when initially opening the bottle of wine. For those bottles that haven't had it removed, just use an existing tear or create one with a pair of scissors and peel the cork cover off completely and discard.
 In an effort to look a little less cheap, we're going to do our best to remove the old labels on the reused bottles. After attempting to rip labels off, wetting and and peeling and soaking and scrubbing the labels off, all achieving minimal success, I heard a suggestion about using Trisodium Phosphate (TSP) to remove the labels. TSP is a wall prep solution used by painters to remove old wall paper. It is also surprisingly effective at removing the glue that holds on wine labels.
Use the concentration the package recommends for household cleaning and add to hot water and soak the bottles.
 Let the bottles soak for about 5 minutes and then the TSP should start to do its work. There is a sweet spot for soaking the labels in the TSP/water solution where the TSP and the water's heat have loosened the label, but the moisture hasn't broken down the label to the point that it comes off in shredded little pieces. The ideal is when it comes off easily in one piece. Past this point you can still remove the labels and glue with ease, but the labels no longer just slide off, they require a little more elbow grease or come off in small pieces. Either way, the going is much easier than my earlier experiments, especially when scaled out to the larger numbers of bottles we are working with.
 This picture gives the ideal example. However, for whatever reason, some labels are more persistent than others. These often require a bit of scraping. I used a metal spatula and steel wool to do it. This required a lot of effort for these specific bottles, one of those 90% of my time was spent on 10% of the bottles. Now that I've sunk a few hours into this project I'm willing to admit that I will never look at a bottle of Yellow Tail or Bogle with quite the same eye. Those were the labels that even after multiple soaks and scrubs refused to completely come off and the bottles remained gummed up with the label's glue.
Also be sure the give each bottle a thorough rinse. While TSP might not be toxic in small quantities, you still want to completely rinse it off the bottles. Especially since on bottling day, the bottles will probably only get a rinse or two of sanitizer and possibly a quick water rinse. Better to get all the chemical cleaners off now than try and do it right before filling the bottle with wine.
 Eventually I worked my way through the bottles we've accumulated and started to get a handle on the scale of the project. I spent about 3 to 4 hours cleaning the bottles. But in the end, we ended up with a nice quantity of cleaned, but mismatched bottles. Still better than paying for the damn things. I was also able to organize and box the wine bottles, hopefully to turn what was a haphazard pile into something approaching organization.
 The next thing to figure out was to test different spray paints with our stencil. I grabbed a white primer and a white spray paint to see if either would be a better match with our labeling method. I also considered a roller or a sponge, but figured I'd try spray paints first, since they'd probably be the quickest way to get the paint onto the bottle. Though it's unknown how well either will stick to glass or if second coats will be required.
 The stencil was a little larger than a bottle, it went long at the bottom and overlapped around the back side. I'll need to trim is down for when we are in assembly line-mode painting the bottles. We should also figure out a way to rubber band the stencil, so you don't worry about painting your hand while applying the label.
 The painted labels, while not perfect do work pretty well. There didn't seem to be a difference between the primer or the plain white paint. Both were prone to running a little, but with a little practice it may get a little easier.
 I think the rubber band holding the stencil on is going to be key, since the edges of the stencil were prone to letting a little bit of the spray in under them. If the rubber band is in place the edges would be held a little firmer. It would also allow for a little more attention to be taken off worrying about getting your hand sprayed and focused on doing a better job painting. It would also allow for spraying the paint from a distance further away from the bottle, the short spray was a result of me trying to balance holding the stencil on the bottle, not painting my fingers, not painting the deck and getting good coverage. Not ideal.
 The stencil was also prone to collecting paint on the back side, either the rubber band should deter this or we'll need to wipe down the stencil after every few applications.
 Overall, I like the label, but it could needs a little refining. I also inventoried the bottles after cleaning, currently, we have 8 and a half cases of wine bottles, which is just over one-hundred bottles. Halfway to our goal of approximately 200 bottles. Good thing we still have a few more months to go.
I may repeat this process with my collected beer bottles once I design a label for my brews. But that's still a ways off.
Friday, January 8, 2010
Wine Club
One of the fun parts of being a winemaker is being a critic of wines. By gaining first hand experience making wine, you also gain a little extra perspective. It's now your duty to critically evaluate your own wine and eventually this starts to bleed out into other wines you try and comparison is inevitable.
Up until this point in my life, I've been a rather uncritical consumer of wines. There have been bottles I like and seek out again and wines I avoid after experiencing, but my evaluations have been haphazard and definitely focus on the wines I can afford (read: the bottom tier of the wine pricing spectrum). I'll occasionally do a swirl and check the nose of the wine or eye the color in the glass, when the snob in me wants to make itself known, but beyond the odd moment of showiness I haven't put much effort into learning more about wines.
When it comes to beer brewing I have few making the occasional batch that is subpar, since I'll probably be the one drinking most of it and I can always go back next week and give it another shot (though I do love a good beer...). My winemaking efforts involve a few more people and a much greater quantity, so the quality of the final product has more riding on it. Plus if your batch gets messed up, you're SOL until the next harvest rolls around. And the ingredients cost a little more.
So before I can be sure I'm making good wine I need to hone my tasting skills. To do this I'm making a concerted effort to develop my wine palate. One means that Sara and I stumbled upon to attend meetings with the wine club that a few of our friends in Sacramento are part of. We went to our first meeting last night and received quite an education.
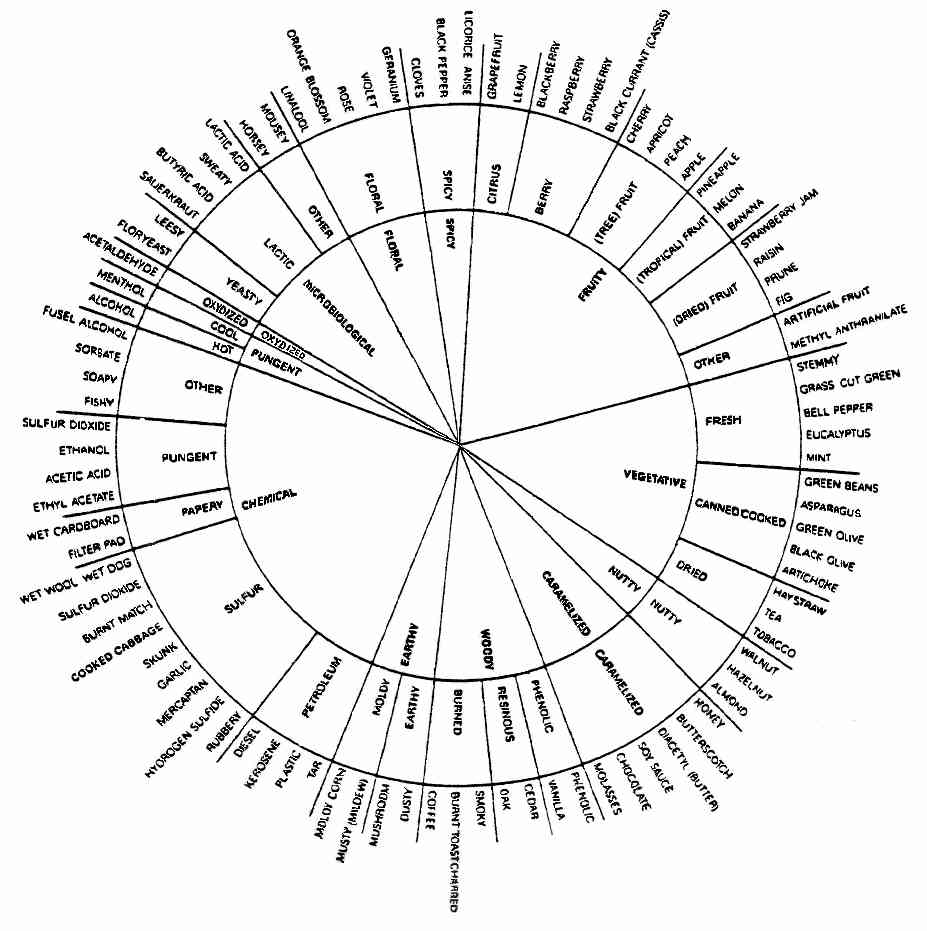
The wine club is sort of like a book club, for wines. Each meeting has a theme tying the wines together, last night's was Barbera. The meeting featured blind pourings, followed by scored evaluations of appearance, aroma, taste, aftertaste and an overall score. The score cards included the infamous flavor wheel and provided some guidance for the uninitiated. After all that there's a reveal and people's scores are added up. Then people finish the remaining wine and can compare and discuss the wines tasted.
After starting out conservative with my scores, I started to come into my own and identify things I did and did not enjoy in the wines. The biggest help was tasting several Barbera wines in quick succession. It allowed for comparison and interpretation of their differences that wouldn't be possible if those tastings were spread out over several evenings or interspersed with other varietals. I also enjoyed the effort all the participants made to avoid talking about the scoring until after the wines had been tasted. It forced tasters to dig down and try and place the flavors that were present in the wine. This was especially noticeable when one of the participants blurted out canned green beans and for the rest of the tasting that's all I could get out of that one Barbera. I'll chalk that up to either the power of suggestion or the fact that she did nail the flavor.
Since Sara and I enjoyed the experience, we're signing up for more and hope to try to do it once a month. Hopefully we'll gain a little education in wine and develop our tastes along the way.
Up until this point in my life, I've been a rather uncritical consumer of wines. There have been bottles I like and seek out again and wines I avoid after experiencing, but my evaluations have been haphazard and definitely focus on the wines I can afford (read: the bottom tier of the wine pricing spectrum). I'll occasionally do a swirl and check the nose of the wine or eye the color in the glass, when the snob in me wants to make itself known, but beyond the odd moment of showiness I haven't put much effort into learning more about wines.
When it comes to beer brewing I have few making the occasional batch that is subpar, since I'll probably be the one drinking most of it and I can always go back next week and give it another shot (though I do love a good beer...). My winemaking efforts involve a few more people and a much greater quantity, so the quality of the final product has more riding on it. Plus if your batch gets messed up, you're SOL until the next harvest rolls around. And the ingredients cost a little more.
So before I can be sure I'm making good wine I need to hone my tasting skills. To do this I'm making a concerted effort to develop my wine palate. One means that Sara and I stumbled upon to attend meetings with the wine club that a few of our friends in Sacramento are part of. We went to our first meeting last night and received quite an education.
The wine club is sort of like a book club, for wines. Each meeting has a theme tying the wines together, last night's was Barbera. The meeting featured blind pourings, followed by scored evaluations of appearance, aroma, taste, aftertaste and an overall score. The score cards included the infamous flavor wheel and provided some guidance for the uninitiated. After all that there's a reveal and people's scores are added up. Then people finish the remaining wine and can compare and discuss the wines tasted.
After starting out conservative with my scores, I started to come into my own and identify things I did and did not enjoy in the wines. The biggest help was tasting several Barbera wines in quick succession. It allowed for comparison and interpretation of their differences that wouldn't be possible if those tastings were spread out over several evenings or interspersed with other varietals. I also enjoyed the effort all the participants made to avoid talking about the scoring until after the wines had been tasted. It forced tasters to dig down and try and place the flavors that were present in the wine. This was especially noticeable when one of the participants blurted out canned green beans and for the rest of the tasting that's all I could get out of that one Barbera. I'll chalk that up to either the power of suggestion or the fact that she did nail the flavor.
Since Sara and I enjoyed the experience, we're signing up for more and hope to try to do it once a month. Hopefully we'll gain a little education in wine and develop our tastes along the way.
Sunday, December 27, 2009
2009 Syrah - Day 63 - Racking
Having a little extra labor around as a result of the holidays, it seemed like an excellent chance to rack the Syrah. I was hoping to take advantage of the cold late-December temperatures to drop the tartaric acid crystals from solution in the wine. Unfortunately rushing out of my parent's house on Christmas Day, I forgot to grab my siphon and carboy and as a result was a few key pieces of equipment short of what we needed for an efficient and effective racking. So as soon as the brew store in Sacramento opened the day after Christmas I was there with Spencer and Matt to get what we needed. This delay let it warm up into the the 50s, so the temperature was probably too warm to pull the tartaric crystals out. Guess we'll need to be a little more on point next time we rack the wine.
 With a new carboy and small diameter siphon in hand we set to racking the wine. As this was our first endeavor that we didn't have an easy siphon, we struggled to find a sanitary way to get siphon started without the ease of a one-way valve.
 Basically it was amateur hour of us trying different ways to get enough liquid in the tube to get the siphon started. We tried everything from using a straw to get it started to crinking the hose and pumping. All to no avail. The siphon refused to get started well enough for gravity to take over. Finally we went back to the book we'd been referencing and reread the racking section.
 We basically settled on you can't start the siphon without some amount of cross contamination (if you're lacking a one-way valve). The book recommended using your mouth to start the siphon and then treating the transferred wine with a dose of sulfites to kill any contaminants. I wasn't particularly happy with this solution, but nothing better was presenting itself so we went for it.
 After we got the siphon going it was just a matter of waiting for the smaller diameter tube to drain each of the carboys. It took awhile for the 38 gallons to pass through the small diameter tube of the siphon. That worked out OK, since we only had one extra carboy and it gave us enough a gap between steps to clean the lees out of the most recently emptied carboy, sanitize it and then measure and dilute the sulfites before we needed to start filling the new carboy without losing our siphon.
Another thing we made a conscious effort to do was to aerate the wine. Racking it the one time it is a good thing to have the wine exposed to air. A little bit of oxygen helps to kick into gear that last remaining yeast so they can burn through the remnants of sugar that might have made it through the secondary fermentation. It also gives the malolactic bacteria a little bit of a nudge, since the wine is oxygen poor after all the biological activity that's been taking place in it. After this racking, one of the main goals of the vintner is to protect the wine from exposure to air and light. These can damage the wine. One way to minimize exposure to air it to make sure the wine is filled all the way to the neck of the carboys. This gives the surface of the wine a minimal exposure to the air and thus minimizes the oxidation of the wine.
 We also tried to minimize our wine lost during each racking by tipping the carboys on their side as the siphon was drawing near the bottom. This does stir up a little bit of the lees, but it also allows the siphon to capture a little more of the wine that would otherwise be left on the lees and dumped out on the lawn. It doesn't disturb the lees too much as it tends to be a heavier sludge than the wine we were trying to siphon.
Most sources say you expect to lose about 10% of your volume during the first racking. This may seem like a lot, but it's the price you pay for clean and clear wine. This batch ended up only losing about 2.5 gallons (out of 38 siphoned), a little less than the amount expected. I'd like to chalk that up to careful siphoning, but we may have also pulled a little bit more yeast than is ideal into the next round of aging the wine. Only time will tell.
 The wine tasted good. The malolactic fermentation was further along than the Cabernet. This was a surprise since the Syrah was stored in a much colder environment than the Cab (my garage for the Syrah, Luke's closet for the Cab). The colder temperature is supposed to inhibit the bacteria's progress and growth. Unfortunately the dose of sulfides likely arrested the malolactic fermentation by killing all the bacteria that we inoculated the wine with. That will need to be something we need to pay attention to the next time we rack the wine. The secondary fermentation tasted like it was close to done, if not completely finished. We didn't put a sample through the hydrometer, but I will probably try to do it next weekend so that we can have a few hard numbers to work with, same probably should be true for an acid titration. It's been since primary fermentation that we've looked at those numbers and an update on the progress would give us a look into the progress the wine has made. There was a little carbonation in the wine too, though not as much as in the Cabernet. Other than that the wine tasted good, but it definitely needs a bit more time for the flavors to develop and to clarify further. I'm thinking the next racking should be two or three months down the line, but we will see.
 With a new carboy and small diameter siphon in hand we set to racking the wine. As this was our first endeavor that we didn't have an easy siphon, we struggled to find a sanitary way to get siphon started without the ease of a one-way valve.
 Basically it was amateur hour of us trying different ways to get enough liquid in the tube to get the siphon started. We tried everything from using a straw to get it started to crinking the hose and pumping. All to no avail. The siphon refused to get started well enough for gravity to take over. Finally we went back to the book we'd been referencing and reread the racking section.
 We basically settled on you can't start the siphon without some amount of cross contamination (if you're lacking a one-way valve). The book recommended using your mouth to start the siphon and then treating the transferred wine with a dose of sulfites to kill any contaminants. I wasn't particularly happy with this solution, but nothing better was presenting itself so we went for it.
 After we got the siphon going it was just a matter of waiting for the smaller diameter tube to drain each of the carboys. It took awhile for the 38 gallons to pass through the small diameter tube of the siphon. That worked out OK, since we only had one extra carboy and it gave us enough a gap between steps to clean the lees out of the most recently emptied carboy, sanitize it and then measure and dilute the sulfites before we needed to start filling the new carboy without losing our siphon.
Another thing we made a conscious effort to do was to aerate the wine. Racking it the one time it is a good thing to have the wine exposed to air. A little bit of oxygen helps to kick into gear that last remaining yeast so they can burn through the remnants of sugar that might have made it through the secondary fermentation. It also gives the malolactic bacteria a little bit of a nudge, since the wine is oxygen poor after all the biological activity that's been taking place in it. After this racking, one of the main goals of the vintner is to protect the wine from exposure to air and light. These can damage the wine. One way to minimize exposure to air it to make sure the wine is filled all the way to the neck of the carboys. This gives the surface of the wine a minimal exposure to the air and thus minimizes the oxidation of the wine.
 We also tried to minimize our wine lost during each racking by tipping the carboys on their side as the siphon was drawing near the bottom. This does stir up a little bit of the lees, but it also allows the siphon to capture a little more of the wine that would otherwise be left on the lees and dumped out on the lawn. It doesn't disturb the lees too much as it tends to be a heavier sludge than the wine we were trying to siphon.
Most sources say you expect to lose about 10% of your volume during the first racking. This may seem like a lot, but it's the price you pay for clean and clear wine. This batch ended up only losing about 2.5 gallons (out of 38 siphoned), a little less than the amount expected. I'd like to chalk that up to careful siphoning, but we may have also pulled a little bit more yeast than is ideal into the next round of aging the wine. Only time will tell.
 The wine tasted good. The malolactic fermentation was further along than the Cabernet. This was a surprise since the Syrah was stored in a much colder environment than the Cab (my garage for the Syrah, Luke's closet for the Cab). The colder temperature is supposed to inhibit the bacteria's progress and growth. Unfortunately the dose of sulfides likely arrested the malolactic fermentation by killing all the bacteria that we inoculated the wine with. That will need to be something we need to pay attention to the next time we rack the wine. The secondary fermentation tasted like it was close to done, if not completely finished. We didn't put a sample through the hydrometer, but I will probably try to do it next weekend so that we can have a few hard numbers to work with, same probably should be true for an acid titration. It's been since primary fermentation that we've looked at those numbers and an update on the progress would give us a look into the progress the wine has made. There was a little carbonation in the wine too, though not as much as in the Cabernet. Other than that the wine tasted good, but it definitely needs a bit more time for the flavors to develop and to clarify further. I'm thinking the next racking should be two or three months down the line, but we will see.
Thursday, December 17, 2009
Cabernet Sauvignon - Day 68-ish - First Racking
 Last night we finally got around to doing our first racking on the small batch of Cabernet Sauvignon that Mr. Sauer was kind enough to get started while I was out of the country in late September and early October. After a few weeks in his garage and a few more weeks in his hall closet it was time to get the wine off the yeast and other sediments that didn't get pressed out two months ago (has it really been that long?).
 The first step in racking (after the obligatory sanitizing of every instrument and surface that will contact the wine) is to siphon the wine from the container its been in to the container where it will do the next leg of its journey. For us, this was from one 6.5 gallon carboy to another 6.5 gallon carboy. Nothing too revolutionary here. We used my easy siphon that employs a one-way valve and two different diameter tubes to get a siphon going without too much effort. This beats risking of contamination by sucking on the line at the bottom of the siphon until gravity takes over.
 Once the siphon gets going there really isn't much to do other than keep the siphon's intake away from the yeast and other sediments that have settled to the bottom of the carboy. This mostly leads to sitting around holding the siphon's neck. Good excuse to work on the bottle of wine we opened with dinner, try and come up with New Years plans and catch up on our idle chatter.
 Once the wine starts getting down towards the bottom of the carboy a little more attention is required. The goal is to leave as little of the wine as possible on the lees, but also to transfer as little of the lees into the new carboy as possible. This is where a little more focus on the part of the racker is required. The racker needs to keep the siphon intake out of the yeast and sediment at the bottom of the wine's old container (the "lees" of the wine), but also keep the siphon intake in the liquid since if it starts slurping air, the siphon's integrity can be broken and the air bubbles could bring it all to a halt. Not stopping the siphon is especially important, since when you near the end there often isn't enough liquid to restart the siphon without sucking up a significant amount of sludge that's settled to the bottom of the carboy.
 This tension between quality and quantity of the finished wine is a delicate balance. Almost any vintner is reluctant to see wine abandoned and wasted by being left behind on the lees, but careful attention needs to be paid to not carrying over too much of the yeast and the flavors the lees will impart if it remains on the wine too long. A little tip of the carboy we're siphoning out of won't disturb too much of the settled yeast, but will allow us to capture more of the wine that is near the bottom of the carboy. Though it's really a judgment call how close a vintner wants to "scrape the bottom of the barrel" to keep from wasting wine.
 After the siphon transferred as much of the wine as we were able, we were left with a little bit of waste product and more room in the fresh carboy than is ideal. Since we want to minimize the surface area of the wine exposed to air as a means to minimize oxidation we needed to fill the carboy to the neck. There are a few different means of accomplishing this when there is a gap after racking. One is to fill the new carboy with some medium that will raise the volume of the liquid so the wine fills the carboy to the neck. This could be accomplished with glass marbles or possibly oak chips/balls/staves. Oak products should be closely monitored, since they will affect the finished flavor of the wine and can result in an over-oaked flavor if the wine isn't taken off the oak when it reaches the desired flavor. As we had neither oak chip nor marbles handy we opted for increasing the volume of the wine with some off the shelf Cab from the liquor store across the street from Luke's house. Not ideal, but with the limited options at 10:30 last night, it was our best solution.
 We no longer can call our wine exclusively Napa Valley (we ended up adding 750 ml's of an Australian Cab and a California Cab), but we did eliminate this air gap, so that it will be ready to undergo the next leg of the racking process with risking oxidation of the wine.
Finally we did manage to taste a bit of the wine. The malolactic fermentation had mellowed some of the acid taste in the wine, but there was still a long way to go. The malolactic fermentation is something we'll need to closely monitor during the next racking or two to ensure that it finishes its work on the wine. The secondary fermentation had also left some residual carbon dioxide in the wine. You could definitely taste/feel the pinprick of bubbles in the wine. This mild carbonation should slowly dissipate. The goal is to have it all gone before we bottle. This carbon dioxide isn't all bad. As the wine slowly off-gases the carbon dioxide, it maintains a blanket of the gas over the surface of the wine. This layer of gas acts as a natural protection for the wine preventing wild microorganisms from colonizing the wine. When we no longer taste or feel the CO2 bubbles it will probably be necessary for us to protect our wine with another small dose of sulfites to keep it from getting contaminated. Overall, so far so good and our wine is well on its way to being a bottle-able finished product.
Monday, December 14, 2009
Sources of Knowledge
I'd like to imagine that the viticulture and enology coursework I did as an undergrad was a valuable part of my present knowledge base in wine making. Alas, most of the wine classes I took at UC Davis were very wide brushstrokes and left me with little practical knowledge or experience. Some of the upper level courses may have alleviated this distance, but my inability to pass organic chemistry prevented me from proving or disproving this hypothesis.
 Instead my current wine making knowledge comes from more readily accessible sources. Specifically a book uncovered by Luke has been the source of most of my knowledge and my go-to reference for this wine making endeavor. The Way to Make Wine: How to Craft Superb Table Wines at Home by Sheridan Warrick has been an invaluable resource to helping us get through our first two batches of wine. It's straightforward approach to wine making goes a long way towards pulling away the veil of mystery that shrouded the art. The chapters are well organized and warn you of the various perils and issues you will run into along the way. The book is thankfully equipped with a good index, which is a vital tool when you might read through a process and then need to relearn how to do a specific step months later. The book is also thankfully written with beginners in mind and definitions are included and explained. I can't recommend the book enough as a resource for the first time vintner or someone who has a little more to learn about wine making.
 Instead my current wine making knowledge comes from more readily accessible sources. Specifically a book uncovered by Luke has been the source of most of my knowledge and my go-to reference for this wine making endeavor. The Way to Make Wine: How to Craft Superb Table Wines at Home by Sheridan Warrick has been an invaluable resource to helping us get through our first two batches of wine. It's straightforward approach to wine making goes a long way towards pulling away the veil of mystery that shrouded the art. The chapters are well organized and warn you of the various perils and issues you will run into along the way. The book is thankfully equipped with a good index, which is a vital tool when you might read through a process and then need to relearn how to do a specific step months later. The book is also thankfully written with beginners in mind and definitions are included and explained. I can't recommend the book enough as a resource for the first time vintner or someone who has a little more to learn about wine making.
Friday, December 11, 2009
Syrah - Day 47 - Finished Cutting the Template
 After a lot of trimming and shaving down all the burs, repair tape and fragile letters I've finished cutting out the template for our "labels." Nothing too dramatic. Now we just need a can of spray paint to test out the label and see if it's going to do the job and if the scotch taped sections are going to hold. I'm also considering doing a second stencil that would go behind the first one and add another level of complexity to the operation/design. Any ideas on what the stencil could depict?
  Or should we stick with the less labor intensive approach? I'm always a fan of not having to paint our 200 bottles twice.
Subscribe to:
Posts (Atom)